Showing posts with label Jeanette Lee. Show all posts

Wednesday, June 3, 2015

Between the Pages . . .

Several months ago we discovered a few posts of Challenges from our "ATC Workshop & Swap" Group that hadn't make their way to the Blog.  So, in an attempt to correct this oversight, and with apologies to the artists, here's the next installment in the series of what we'd like to call "The Forgotten Posts" . . .
     
Have you visited a library lately?  Are you familar with the area where old, discarded books are kept, usually sold for a dollar or less?  A lot of us these days do our reading on our computers or Kindles, so while these old books might seem like useless objects to some, to an artist they can easily be altered into glorious and fantastic works of art.  They might become the starting point for a wonderful album or maybe the start of an exciting art journal . . . the possibilities are endless!  When you look at an old book and you're told "be creative", what comes to your mind?  What would you create?  Where would you start?  That was the Challenge given at our "ATC Workshop & Swap Challenge" Group last November.  If you take a just minute and "think outside the box", each old book is actually just blank pages begging for all sorts of artistic touches.  Take a look at some of the amazing and creative results from our extremely talented group of artists . . .
     
This month's Challenger, Jeanette Lee, who just happens to work at the library, couldn't stop with just one ~ book that is!  To go along with the season, Jeanette created her first altered book in the shape of an Halloween "jack-o-latern" after carving its shape from an old discarded library book. To continue with the illusion, she pulled all the book pages together to meet and adhered them, forming a circular shape, then inked the page edges in bright orange.  As a finishing touch, she inserted a twisted floral stem into the center of the pages, and viola . . . it's a pumpkin!
Her second book was again created from another discarded library book into a beautiful art journal where she practices her many artistic talents & techniques.  To camouflage the original covers, she wrapped front & back with a favorite paper, then added fabric to the spine where she wove in coordinating beads & ribbons.
     
Charmaine Conway approached the Challenge in a little different direction.  She created deep texture & depth on the outside surfaces of her book using texture paste, then pressed a woodgrain embossing folder into the paste.  The embossing folder was removed while the paste was wet, leaving a wonderful moon crater-type surface.  When the texture paste was dry, a coating of rust was first applied, then highlighted with various metallic acrylic paints.  The book pages were adhered together along the edges, as well as to each cover, then painted in several shades of gold & copper metallic acrylic paints to give the illusion of an old book.  Nuts from the hardware store & pearls to mimic rivets were added as embellishments before painting, with a vintage style jewelry piece placed as the center focal point.
     
Deb Schinzel was another to play with layers & textures when creating her gorgeous altered book.  After collaging & layering torn book pages to the front & back covers, she then applied texture pastes using some of her favorite stenciling techniques.  Her choice of cool green & blue, along with warm cream, paints & accents set the color pallette both for the cover & throughout the pages of her book.  Wood & metal embellishments were added to the front cover, as well a dramatic "fly", which she first stamped on Clearly for Art plastic with archival ink, then heated to shape to create a 3-D effect.  Interior pages were first gesso'd, then stenciled & painted to continue with the overall feel & theme of the book.  To give the book that old & well-worn feel, Deb distressed the page edges before painting & inking in golds & browns to coordinate with the overall color scheme.  For those interested in seeing Deb's book in person, visit the store where it is proudly displayed.
Lylia Hagerty took the title of her discarded book, "Blue City", to heart.  First painting the exterior hard covers of her book in shades of blue, she torn out the title & cover art from the paper sleeve & applied each as embellishments.  Pages that were removed from the book were torn in random pieces & collaged on the back cover, allowing the embossed publishers mark to show through. Everything was then painted in the same blue shade as the front cover.  Inside pages were glued together, then carved out to form a shadow box effect, where Lylia added embellishments to emphasis the idea of a "blue city".  Each piece, if not originally blue, was first painted before being placed in the cut-out area. Beautiful background paper was added for additional interest, as well as Lylia's hand drawn cityscape.  To camouflage the existence of the cut-out, Lylia left the first few pages of the book in place, including the coversheet, but painted them to coordinate with the entire blue city theme.
     
Jean Hamrick is an artist who loves to draw, paint, & so much more . . . all of which she shared in the pages of her altered book.  To hide the lettering on the front cover, Jean painted a canvas board to match the color of the book , then adhered it to create a flat surface. Once secure, she hand drew, then painted, her beautiful Phoenix rising design in oranges & yellows to signify her art as always developing in new & exciting directions.  A second Phoenix was drawn & painted on the back cover in beautiful shades of blues & creams. Leaving the original pages of the book as they were, she emphasized words & phrases with markings in pens & inks.  She also added more of her hand drawn art, as well as collage pieces & everyday stamps & stickers to add to the feel of this book as a work-in-progress journal.  Jean has appropriately named her altered book "create" & says that she continues to do just that when a new thought comes to her or she learns of a new technique.  Just goes to prove that even an old book can make the perfect canvas for displaying your artistic thoughts & talents!
Shiela Rose was another artisit who ran with the Challenge by creating two books.  Her first has been created in an art journal style, the perfect place to keep many of her favorite techniques & designs.  With pages overflowing with collage, Zen Doodle designs, & the use of stencils & stamps, as well as beautiful colors of inks & sprays, Shiela has created the perfect "go-to" techniques reference book.  Prior to the addition of any technique, gesso was applied to each page to give her a clean slate for her designs.  Front & back covers were also decorated after a coat of gesso using her favorite paints, then stamped & stenciled with many of her favorite designs.  Shiela is a firm believer that it's not a true work of art without a stamp or two, and she's definitely proven that with this book!
Her second "altered book" didn't begin its life as a book, but actually as a plastic case to hold one of her grandchildren's DVR movies!  After first covering the case with plain white paper to create the shape of book covers, Shiela then added some bright  & springy patterned paper for her covers. To camouflage the spine of the case, she added glittery coordinating paper in pink, tying in the whole color scheme.  When finished, she's created a clever hiding spot for small items in a "book" that can easily be stored in any bookcase.
     
Any member of the group can "Challenge" the others with creating something special and unique.  Anyone who takes part creates one Challenge Item for "Show & Tell" using everyday mixed media materials . . . embellishments, paints, papers, stencils . . . whatever strikes their fancy! Without any themes or other guidelines, the ultimate goal is to showcase each artist's personality through the type(s) of embellishments, decorations, or techniques used.

Please join us in congratulating & thanking each artist for a job well done!  We'd love to hear what you think, so please leave us a comment . . . or two! . . . and share your thoughts.  And if you'd like to take part in our monthly "ATC Workshop & Swap" or Challenges, join us the second Thursday evening of each month from 6:00pm-8:00pm and you too can begin to think big in a small way!  No membership required and it's FREE!  Hope to see you there!

Watch for our next Challenge Results ~ Altered Hearts ~
coming soon!

CraftFusion
(480) 821-3758
2986 No. Alma School Rd. #4 ~ Chandler, AZ 85224
s/w corner of Alma School & Elliot Roads behind Bank of America
(located next to Catherine's & King's Buffet)
Tuesday - Saturday 10:00am-6:00pm  ~  Closed Sunday & Monday
Pin It

Wednesday, July 16, 2014

A Tin Is Not Just A Tin Anymore!

We've all seen them.  We may even have a few laying around in our craft rooms thinking we'll give them new live in a project by doing something with them. That was the test our Challenger gave to everyone for the June "ATC Workshop & Swap Challenge".  Just what can you do with an empty tin . . . cigar, Altoid, or any other?  Take a look at the amazing results from this truly talented group of artists . . .

Charlotte Fern began with a mini Altoid-type tin & creatively
colored and shaded it with her favorite shades of alcohol inks,
making the perfect home for her altered & coordinated domino.
She added bits of ephemera & metal pieces to both as finishing
touches.

Terri Durst loves to travel.  And when she does, she always takes
a few projects with her to chase away any boredom she might face . . .
whether it's crocheting, papercrafting, or sewing.
Beginning with a slim metal cigar tin, Deb Schinzel created the perfect
"Wonderland" for her Alice.  After running her tin through her Big Shot
using the Oval Magnetic Die, Alice was able to see through the "looking glass"
without any problem.
Jean Hamrick had visions of a day at the beach as she created
her seaside retreat from her Altoid tin.  Covered in cool toned papers and paints,
you can almost feel the ocean breezes in her face and the sand between your toes.
Charmaine Conway once again slipped over to the dark side when
altering her Altoid tin.  Beginning with texture paste & spackle to
disguise the raised lettering, she finished with dark paints & metallic
highlights, along with bits of ephemera, to complete her tin.
Jeanette Lee took her Challenge to
"heart" with her altered candy tin.
After painting the outside with metallic
paints to give a metal look, she finished off
with "Love" related embellishments.
Lylia Hagerty, this month's "Challenger",
couldn't stop with just one tin!  In
fact, she made three . . . all in different
sizes and themes!
Top:  "Brown"; Middle: "Party Time";
Bottom: "Sea Side"
As you know, any member of the group can "Challenge" the others with creating something special and unique.  There're no "rules" except that anyone that participates creates one Challenge Item for "Show & Tell" using everyday mixed media materials . . . embellishments, paints, papers, stencils . . . whatever strikes their fancy! Without any themes or other guidelines, the ultimate goal is to showcase each artist's personality through the type(s) of embellishments, decorations, or techniques used.

Join us in congratulating and thanking all of these great artists for a job well done!  We'd love to hear what you think, so please leave us a comment . . . or two! . . . and share your thoughts.  And if you'd like to take part in our monthly "ATC Workshop & Swap" or Challenges, join us the second Thursday evening of each month from 6:00pm-8:00pm and you too can begin to think big in a small way!  No membership required and it's FREE!  Hope to see you there!

Watch for our next Challenge Results ~ Altered Wooden Spoons ~
coming soon!

CraftFusion
(480) 821-3758
2986 No. Alma School Rd. #4 ~ Chandler, AZ 85224
s/w corner of Alma School & Elliot Roads in the former Mervyn's Plaza
(located between Zoe's Quilts & Catherine's)
Tuesday - Saturday 10:00am-6:00pm  ~  Closed Sunday & Monday

Pin It

Saturday, April 12, 2014

You've Got Mail!

It seems nowadays that everyone gets busy and things get put off.  Important things.  That's exactly what happened with our sharing of the results of our monthly "ATC Workshop & Swap Challenges".  So, without any further ado, it's once again time for the results of our "Challenge" from February.

As you know, any member of the group can "Challenge" the others with creating something special and unique.  There're no "rules" except that anyone that participates creates one Challenge Item for "Show & Tell" using everyday mixed media materials . . . embellishments, paints, papers, stencils . . . whatever strikes their fancy! Without any themes or other guidelines, the ultimate goal is to showcase each artist's personality through the type(s) of embellishments, decorations, or techniques used.  The Challenge given in February was to create "Mail Art Postcards" to share at the next month's Workshop.  The only restriction placed on each artist was that each finished piece could be no larger than 4" x 6", or postcard size.  The results are long overdue in coming, so let's get goin' . . . 

Charlotte Fern created a bright and colorful postcard that anyone would truly enjoy receiving in their mailbox.  Using one of her favorite stamps, she's colored the background with chalks and inks over stencils, blending the colors together.  She then used blended chalks to color to the clothes and hair of her stamp, and viola . . . a gorgeous piece of art that you could easily mail to a friend or display on a shelf at home.


Charmaine Conway once again couldn't stop with just one.  For her first card, Charmaine fell in love with Tim Holtz' project in a recent issue of  a Stampington & Company stamping magazine and had to try to recreate it.  Using embossed metal tape on die cuts, alcohol and distress inks for "age" , and embellishments from Tim's idea-ology line, she's ended up with her version of the original, which looks pretty close to Tim's.  For her second postcard, Charmaine created one with a true travel spirit with a "pocket" perfect for holding all those tickets and ephemera you're sure to gather on your round-the-world trip.  With additional embellishments from Tim's idea-ology line, papers and ephemera from 7 Gypsies, her finished result was ready for mailing.

Deborah Schinzel also had fun with the Challenge and created two postcards.  For her first, she created a whimsical and musical feel using stamps and coloring with Copic markers as accents.  As a final touch, she added a strip of washi tape "stamps".  For her second postcard, she created a small-sized collage from a favorite family photo of two generations of family members with two "sets" of sisters.   The background was created with the blending of opposite ink and paint colors.  To compliment the photo, she's added a favorite sentiment stamp on a coordinated printed paper and embellished with smaller stamps (butterflies and "May Require Extra Postage").

Jeanette Lee was another artist thinking travel as she created her postcard.  Finding an image of a bridge on the internet, she printed it on photo paper to give the look of a true vintage postcard.  Once her image had dried, she added embellishments with stamps using an archival ink so there'd be no smudging.  She added color to the edges with a gold Sharpie pen, before using her "fancy edge" cutting scissors.  Add an "air-mail" flag and "stamp", and her postcard was ready for the mail.


Even before she began,  Nicole Durst had the idea of using a favorite image of a small girl in mind.  She prepared her background with coordinating inks and paper with a vintage feel, tearing the edges for a distressed and aged look and feeling.  After applying the image of the girl, she added highlights with black marker around the edges to make her stand out from the background.  With embellishments of torn words from music, this simple, yet poigant, postcard carries a strong message . . . "I've heard the pray'rs . . . but this one made me cry".


Terri Durst's postcard revolves around all things "girly".  After creating a background on watercolor paper colored with inks, she began with a favorite Julie Nunning stamp from Prima that she stamped onto a piece of cardstock and cut out, removing the skirt.  To create a new and exciting skirt, she twisted strands of crepe paper and "draped" them in a flowing pattern, much like fabric.  She restamped her stamp onto a patterned paper for Julie's top and headband, then fussy cut and applied each over the original image.  Raiding the recycle bin in her office, she discovered stamps and address labels that suited her card perfectly.  Adding additional embellishments of stamps, snippets of papers, and bling, she's created the perfect postcard for any girl, no matter what age.


Lylia Hagerty created her two postcards based on vintage cards and images for Valentine's Day.  With cherubs and roses floating atop layers of colored tissue papers, her first postcard leaves no doubt that it's intended for that special Valentine.  In traditional shades of red, pink, and white, Lylia has added embellishments of glass hearts and sparkle for finishing touches.  Keeping in tune with the same Valentine color pallette, she's created her second postcard with coordinating papers, paints, and embellishments to spell out "Love".  Complete with vintage postage and cancellation stamps on the back of each (not shown), each postcard is a true work of vintage-inspired art.

Join us in congratulating and thanking all of these great artists for a job well done!  We'd love to hear what you think, so please leave us a comment . . . or two! . . . and share your thoughts.  And if you'd like to take part in our monthly "ATC Workshop & Swap" or Challenges, join us the second Thursday evening of each month from 6:00pm-8:00pm and you too can begin to think big in a small way!  There's no membership required and it's FREE!  Hope to see you there!

Watch for our next Challenge Results ~ Found Objects ~ coming soon!

CraftFusion
(480) 821-3758
2986 No. Alma School Rd. #4 ~ Chandler, AZ 85224
s/w corner of Alma School & Elliot Roads in the Mervyn's Plaza
(located between Zoe's Quilts & Catherine's)
Tuesday - Saturday 10:00am-6:00pm  ~  Closed Sunday & Monday

Pin It

Tuesday, February 25, 2014

And the Results Are In . . .

It's once again time for the results of our "Challenge" from our monthly "ATC Workshop & Swap" group.  If you follow our blog, you know we're frequently given "Challenges" by any member of the group.  There're no "rules" other than anyone that participates is asked to create one Challenge Item for "Show & Tell" using everyday mixed media materials . . . embellishments, paints, papers, stencils . . . whatever strikes their fancy! Without any themes or other guidelines, the only goal is to show each artist's personality through the type(s) of embellishments, decorations, or techniques used.  The Challenge given in November was to create "Fascinators" in whatever design we wanted to share at the January Workshop.  The results have been long in coming, so without any further ado . . . 

"A fascinator is a headpiece, a style of millinery. The word originally referred to a fine, lacy head covering akin to a shawl and made from wool or lace, but mostly feathers. In the modern usage, it refers to a woman's alternative to hat for formal attire; it is usually a large hair decoration on a band or clip with elaborate trimmings and decoration like a formal hat and it can incorporate a base to make it a miniature hat designed to be worn on the front, side, or back of the head." (http://en.wikipedia.org/wiki/Fascinator)
  
Charlotte Fern created her fascinator from scratch using papers, ribbons, and images based on her favorite movie, "Alice in Wonderland" with Johnny Depp.  Don't you think she's captured his likeness exactly with the style of her little hat?

Charmaine Conway couldn't stop with just one.  Known for her "steampunk" style, Charmaine surpised everyone with her first fascinator using a formed felt hat with feathers, blooms, ribbons, trims, and touch of bling, without a gear or spot of grunge in sight.  But for her second hat, she stayed true to her steampunk style using gears, trims, feathers, ribbons, and even a touch of touch of bling.

Deborah Schinzel surprised everyone with her super dressy fascinator using an ordinary headband  and sparkly, out-of-this-world looking embellishment from a present she'd received as a gift.  Just goes to show what a little ingenuity can do!

 After watching a YouTube video demonstrating the how-to's of creating blooms from burlapJeanette Lee decided to try the technique for herself in her light & airy fascinator.  Designed to be worn as either a headpiece or pin on a springy blouse, she's created the true multi-purpose art piece.

It seems Nicole Durst was another artist who couldn't stop with just one!  With a dressy version created from a pattern piece she designed herself, it's the perfect accompaniment for any outfit.  With her second design, Nicole stepped "outside the box" a bit, using a small wire birdcage that she placed over her formed felt hat which she crackled painted to resemble  tree bark, then added flowers, moss, and even a bird nest & eggs as embellishments.

Terri Durst raided her stash of  goodies & embellishments and went wild in creating her fun and colorful fascinators.   Using a formed felt hat for her first design, she embellished it with ribbons, feathers, blooms, and of course, a touch of bling.  Using a pattern piece she created herself as the base for her second creation, she added embellishments that would compliment any fall ensemble. 

If you'd like to see more photos or details of any of these fantastic creations, drop us an e-mail.  You'll be absolutely amazed at the creative nature of all of these wonderful artists!

Join us in congratulating and thanking all of these great artists for a job well done!  We'd love to hear what you think, so please leave us a comment . . . or two! . . . and share your thoughts.  And if you'd like to take part in our monthly "ATC Workshop & Swap" or Challenges, join us the second Thursday evening of each month from 6:00pm-8:00pm and you too can begin to think big in a small way!  There's no membership required and it's FREE!  Hope to see you there!

Watch for our next Challenge Results ~ Altered Postcards ~ coming soon!

CraftFusion
(480) 821-3758
2986 No. Alma School Rd. #4 ~ Chandler, AZ 85224
s/w corner of Alma School & Elliot Roads in the Mervyn's Plaza
(located between Zoe's Quilts & Catherine's)
Tuesday - Saturday 10:00am-6:00pm  ~  Closed Sunday & Monday

Pin It

Wednesday, November 20, 2013

Mini Moos Tell Big Stories!

If you follow our blog posts about our "ATC Workshop & Swap" group, you know we're frequently given "Challenges".  Anyone in the group can suggest a Challenge and each one is voluntary.  There're no hard and fast "rules" other than anyone that participates create 1 Challenge Item for "Show & Tell" using everyday mixed media materials . . . embellishments, paints, papers, stencils . . . whatever strikes their fancy! Without any themes or other guidelines, the only goal is to show each artist's personality through the type(s) of embellishments, decorations, or techniques used.  Last month, the Challenge was to create "Mini Moo Cards" in whatever design we wanted to share at the November 14th Workshop.

What's a "moo" card, you ask?  Smaller than an ATC at only 1-1/8" x 2-3/4", Moo Cards or Mini Moo Cards, were first created from people's Flickr photos. The cards quickly became so popular that people began incorporating their own artwork using various techniques, and now these cards are traded in much the same way as ATCs.  All those who took part in the Challenge definitely took their altering skills seriously . . . just take a look at the amazing and varied final results! 

Using her favorite sprays and stamps,
it seems Nicole Durst couldn't stop
with just one!
Created with egg shells and alcohol
inks, Jeanette Lee created beautiful
mini mosaics with her cards.

Terri Durst raided her stash of  goodies
& embellishments to create her fun
and humorous moos.
Deborah Schinzel was feeling the
change in seasons as she created her
card using inks and a favorite stamp.
Charmaine Conway created her
cards using Distress Inks, Stickles,
and stamps for a whimsical look.
By using many different techniques ~
from hand stitching to bling ~ Charlotte
Fern
created cards that told mini stories.
  
There you have it!  Please leave us a comment . . . or two! . . . and let us know what you think.  In the meantime, join us in congratulating and thanking all of these great artists for a job well done!  And if you'd like to take part in our monthly "ATC Workshop & Swap" or Challenges, join us the second Thursday evening of each month from 6:00pm-8:00pm and you too can begin to think big in a small way!  There's no membership required and it's FREE!  Hope to see you there!

Watch for our next Challenge ~ Fascinator Hats ~ coming in January 2014!

CraftFusion
(480) 821-3758
2986 No. Alma School Rd. #4 ~ Chandler, AZ 85224
s/w corner of Alma School & Elliot Roads in the Mervyn's Plaza
(located between Zoe's Quilts & Catherine's)
Tuesday - Saturday 10:00am-6:00pm  ~  Closed Sunday & Monday

Pin It

Wednesday, September 18, 2013

Magical Sand Dollars . . .

Last Thursday evening was another fun evening in our monthly "ATC Workshop & Swap" group with another exciting "Challenge" . . . what can you do with an ordinary sand dollar?  Real, dried sand dollars direct from the beaches of Rocky Point, Mexico were provided by Lylia Hagerty, and anyone who wanted to take part in the Challenge was invited to take one or two.  Since there were no themes or other guidelines, everyone in the group who took part definitely took their talents to the max with their creations!  Just take a look . . .

"Alice in Wonderland"
created by Lylia Hagerty
Materials Used:  Papers from Graphic 45's "Alice in Wonderland" collection (retired); thread spool painted with Inka Gold; glaze on sand dollars; chipboard; wire for hearts; tulle netting for "grass" at base
"Wall Hanging"
created by Mimi Lawrence
Materials Used:  Wood frame painted with acrylic paints (frame designed for mosaic tiles); various papers from stash for background; hexagon punch; miscellaneous inks & paints for shading; fiber from Ponds face cleaning cloth; miscellaneous shells and sand
"Sand Dollar CD"
created by Jeanette Lee
Materials Used:  CD disc (back); corrugated cardboard; modeling paste tinted with acrylic paints; miscellaneous shells and embellishments; stung shell necklace at edge
"Halloween Fright"
created by Charlotte Fern
Materials Used:  Gesso paint; black permanent archival ink for stamp; "spider" & vine stamp; tissue paper transfer; miscellaneous embellishments (skull & bat); coordinating ribbons

"Metallic Beauty"
created by Deborah Schinzel
Materials Used:  Metal tape; alcohol inks; Tim Holtz idea-ology "Word Band"; metal embellishment from "stash"; waxed linen at openings; ball chain to hang

"Diva Bling (l) & Industrial Chic (r)"
created by Charmaine Conway
Materials Used:  "Diva Bling" ~ gesso; acrylic paint with pearlized glaze; multi-medium (gloss); self-adhering rhinestones; Glossy Accents; ribbon; charm / "Industrial Chic" ~ gesso; rust & patina (Modern Masters); Stickles (Platinum); Tim Holtz idea-ology "Sprocket Gears"; dollhouse "mirror"; charm & fibers from Industrial Chic (Susan Lenart Kazmer); miscellaneous embellishments (bird, mini gears)

(Not Shown:  "Red, White, & Blue ~ Remembering 9/11", created by Terri Durst)

There you have it!  Please leave us a comment . . . or two! . . . and let us know what you think.  In the meantime, join us in congratulating and thanking all of these great artists for a job well done!  And iIf you'd like to take part in our monthly "ATC Workshop & Swap", join us the second Thursday evening of each month from 6:00pm-8:00pm and you too can begin to think big in a small way!  There's no membership required and it's FREE!  Hope to see you there!

CraftFusion
(480) 821-3758
2986 No. Alma School Rd. #4 ~ Chandler, AZ 85224
s/w corner of Alma School & Elliot Roads in the Mervyn's Plaza
(located between Zoe's Quilts & Catherine's)
Tuesday - Saturday 10:00am-6:00pm  ~  Closed Sunday & Monday

Pin It

Wednesday, August 14, 2013

On the Street Where We Live

For those of you who are familiar with our monthly "ATC Workshop & Swap" group here at CraftFusion, you know we often have "Challenges" presented to us in addition to our regular Artist Trading Cards.  Each Challenge is voluntary and can be thrown out by anyone in the group.  For each Challenge, each artist is asked to begin with something that they may not normally work with and is intended to stretch everyone's creative imaginations, but most importantly, encourages us to "Color Outside the Lines"!

The Challenge for August was no exception.  Presented by Rita Blocksom, we were each given a piece of 2x4 scrap lumber in various lengths and challenged to create a "house" using any type of techniques and embellishments we wanted. Without themes of any type or other guidelines, everyone who took part in the Challenge definitely did "Color Outside the Lines"!  Just take a look and see for yourself . . .

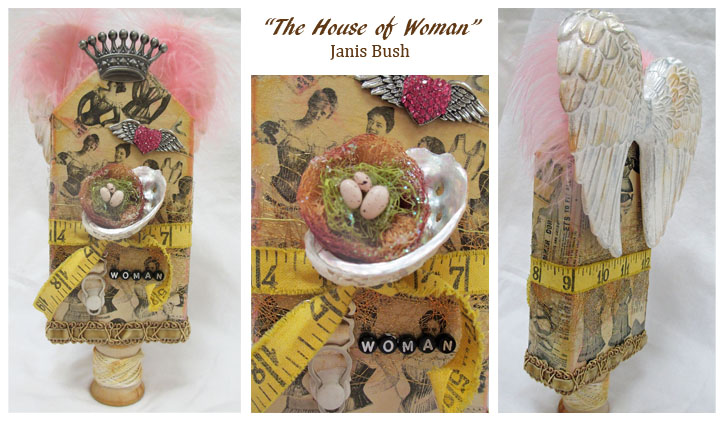
"On the Street Where We Live" (l to r) - "The Old Lady on the Corner", Charmaine Conway; "Black Cat Society", Nicole Durst; "Fright Night Inn", Terri Durst; "My Island Paradise", Jeanette Lee; "La Sierna", Lylia Hagerty; "The Cat House", Deborah Schinzel; "The Bird House", Charlotte Fern; "The House of Woman", Janis Bush

First covered with strips of dictionary pages placed in all directions, Charmaine mixed faux "stucco" with acrylic paint for color, then applied it to allow the lettering of the pages to show through.  Modeling paste was used with a brick design stencil for the crumbling planter look, then colored with Tim Holtz' Aged Mahogany and Fired Brick Distress Inks. Wood trim from a large box store hobby section was cut and glued to the "roof", with more stucco applied in between each piece for the Spanish tile look.  Dried lichen was applied as a final touch.

Just in time for Halloween, Nicole first gave her wood an overall coating of black. After covering the flat areas with red papers, she then embellished with touches of inks and more paints.  Images of a man and woman were stamped on Shrinky Dink, then placed on the front of the house as "windows".  The roof was constructed from corrugated cardboard, with a copula complete with a Shrinky Dink covering and spider web awning!  A horse drawn coach, also created from Shrinky Dink, was placed on the astro-turf covered based in front of the swinging doors, and the sign was hung from the roof using a jump ring.  Silver trim was added to the base for that wrought iron fence look giving the overall look of Halloween.

Terri also used Halloween as her theme, as she created her spooky little inn.  After painting her wood, Terri used a glittered faux wood grained paper to cover the flat surfaces.  She also used corrugated cardboard as her roof, hanging her "Fright Night" sign with chain and a jump ring. She created her porch covering with corrugated cardboard and added a string of hand-strung orange beads as "lanterns" to guide you through the front doors. To warn of possible dangers for visitors, Terri applied glittered signage on the back of the house, as well as a skeleton who pops out to scare off intruders. Be careful, as you're bound to see a pair of green glowing eyes watching you from the small hole on the back corner . . . watch your step!  For "grass", a strip of fabric was folded in half, then gathered to fit the base of the house. Snips were made and shaken out to cause the fabric to fray before being glued around the base.

Jeanette dreams of vacations in the tropics, and her little house shows it. In bright pastel colors of acrylic paints, you have the feeling of easy Caribbean living and ocean breezes.  Roof "tiles" were made from rolled pages of recycled books, then decorated with gesso and more paints.  Lace and trims were entwined within the tiles, giving the look of tropical vines and foliage.  With the warm temperatures, beautiful butterflies fly freely in the tropics, and in Jeanette's dreams, as well.  It's time to set your clocks for island time and head south, because Jeanette's left the key to the front door waiting on the hook!

Direct from the shores of the Gulf of Mexico, Lylia returns to Arizona with visions of mermaids and sea creatures floating through her imagination.  After first covering her house with torn cocktail napkins in soothing tones of blue,aqua, and green, she's created the perfect place for all those visions to gather.  Her mermaids float over and through small shells and bits of sea glass she's found in her walks along the beach, with their glittery tails and scales reflecting the sunlight from overhead.  With a canopy of shell embellished trim hung around its roof line, you can easily see Lylia's love of the beach and water.  (La Sirena translated from Spanish means "the siren", as in a beautiful woman, or mermaids)

After inking several papers in varying shades of gelatos, inks, and paints, Deb tore each into small pieces and applied them helter-skelter, creating the colorful and lively siding to her house.  To protect the colors and edges of the papers, she applied a thin coat of Modge-Podge.  Her kitty is a favorite stamp done on cross-stitch fabric and colored with markers and inks, and seems to be watching the small silver bird that's landed outside the front door.  And if you look closely, you're sure to see her friendly puppy in the backyard playing and smelling the flowers, while chasing butterflies.  Her roof has been constructed out of corrugated cardboard and painted to give it an aged look, with a chimney made from a drinking straw.  A vintage doily from Grandma was added for trim to finish the roof, and jute was looped around the base as a "hedge", making for the perfect home for Kitty.

From kitties to birds, Charlotte has created the perfect home for our feathered friends.  Covered entirely with bird themed tissue paper, you'll also find flowers growing behind the picket fence all around the base.  And for the birds dining enjoyment, take a look at the hanging bird feeder created from a small, suspended bottle complete with a "wood" perch . . . it's even filled to the top with bird seed! The roof has been created from metal, with various alcohol inks to add brightness and color.  What bird wouldn't be at home here!

Through the years, Woman has always worried . . . about her appearance, her weight, her actions.  Inspired by the page of a vintage catalog showing women in tight corsets and undergarments, Janis captures all these worries to show the actual beauty of woman. Covering her wood with various sized torn pieces of the catalog page that first inspired her, she then added a coat of multi-medium to hold the edges and protect the surface.  After embellishing with inks in soft tones of pinks and browns, she's accented with bits and pieces of female-related items . . . a piece of vintage cloth tape measure, a garter, a sparkly heart, and a true Queen's crown.  As a final touch, she's added a beautiful pair of gold tinged wings and pink fluffy feathers.

So, there you have it!  Please leave us a comment . . . or two! . . . and let us know what you think.  In the meantime, join us in congratulating and thanking all of these great artists for a job well done!

 If you'd like to take part in our monthly "ATC Workshop & Swap", join us the second Thursday evening of each month from 6:00pm-8:00pm and you too can begin to think big in a small way!  There's no membership required and it's FREE!  Hope to see you there!

CraftFusion
(480) 821-3758
2986 No. Alma School Rd. #4 ~ Chandler, AZ 85224
s/w corner of Alma School & Elliot Roads in the Mervyn's Plaza
(located between Zoe's Quilts & Catherine's)
Tuesday - Saturday 10:00am-6:00pm  ~  Closed Sunday & Monday

Pin It